Showing posts with label painting. Show all posts

Monday, March 8, 2010

Airships!

Sort of a side post this week , to fill in the time while I work on the Harpies some more, among other things.


Some time ago, back in the heady days when there was still a FASA (sort of?), the Crimson Skies board game and metal miniatures came out (at the time, my gaming group and I played the hell out of it; it's great fun) Given what was available, I embarked on a side project to re-create some of the airships from the Final Fantasy games. Mind you, this was years ago and I'm a better modeler now by magnitudes. Anyway, instead of presenting them in the order in which they were made, here they are in order of the games:


Setzer Gabbiani's Blackjack from Final Fantasy VI. The PS1 version had beautiful trailer and all new (at the time) cg cutscenes, not to mention a gallery of stills for me to ogle while I worked on the model. That's a Reaver torso in there, along with jets from some old metal jump packs. I couldn't find a sailing ship hull that small, so an epic Ork Fighta worked nicely.


Those rather baroque tails are old thin hex bases from Aerotech fighters (which fetched an alarmingly high price on ebay). I liked the Blackjack much more than the airship you exchange it for halfway through the game, which looked like just a blimp with jet engines.


The High Wind from Final Fantasy VII. Still my favorite ship from all the games so far. Hey wait a sec-- something looks odd about her tail section...


Why, those elevators are monstrous! What happened to the overly complex series of rudders and flaps? Well, if you'll recall, it looked like this:


Each nacelle had a lower set of four rudders and three elevators; a veritable grille. Although I'd be up to the challenge now, I don't want to break up a venerable miniature. At the time I must've just said "to hell with this" and gone with the whale-tail. That propellor shaft needs to be longer too, but oh well. It looks nice on the shelf. 


Final Fantasy VIII's Ragnarok. At the time, I was hard-pressed to find decent reference material (and that red is too much on the orange side...) . The original artwork makes it look shockingly complex, until you realize it's just a mecha dragon with a bloody big cannon on it:


Given what was available, I think I did a decent job, although again now I'd do certain parts entirely differently. The cannon is an old metal bright lance I somehow came by back in late '80's/early '90's. A guy at the (now closed) Fairfax GW store just GAVE me a huge handful of metal bits. Man, but those were the days. Of all of these models, the Ragnarok bulks the largest.


Another comparison shot for you. Finding the parts to replicate this thing was an ordeal. If they hadn't put out a series of fish-like tanks for an obscure Babylon-5 based ground combat  game (it had a lifespan of 5 minutes) then the model probably wouldn't even have been possible.


The Hildegarde III from Final Fantasy IX. Thankfully, crazy-ass designers took a turn for the delightfully steampunk. Some people hated that game, but it hit the right spot for me on a lot of levels. If I could've gotten some stills of the summoned convertible airship Ark, I would've made that thing, too. Once I got the summon, I used it almost exclusively; it was cool as hell. 


The boat hull and steamship paddle wheels came from an obscure mini I found at the local gaming store. Looking back there was a lot of detail on the original that I just glossed past. I must've been working on some kind of "good enough" mentality back then. 

That's the last one. The airships for FF-X and so on were so outlandish and unnecessarily complicated it would've been impossible to make them without significant amounts of green stuff and a lot of patience. I'm not even going to go into that bizarre thing from X-2 and its weird arm/wheel nacelles. Jeezus.

Speaking of Crimson Skies, I can do a post of the airplane minis some time. They're great designs and were a lot of fun to paint and use in the wargame. I didn't do the full range, though they're still readily available. I'm guessing the video game kind of eclipsed the hex-based boardgame, which is sad, really. 

Thursday, February 18, 2010

Cloning Tanks Part 2: Artillery

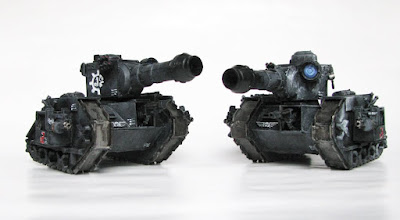
Back from the dentist with a numb jaw today, so that means more tanks. You'll remember these fellows from a post or two ago:
Today we're concerned with the little fellow on the left, the Griffon mortar tank. Nothing wrong with him; Griffon's a fine little tank for the points cost. However we need something to really pound those orks and other monsters into the turf, and his little mortar doesn't quite say "stay out of my deployment zone.  This time taking outlines and measurements for replication was a bit more difficult, as he came from eBay already assembled. I resisted the urge to pull him apart like a wrathful god, and just went with it. Hours of measuring, cutting, glueing, and painting gave us this:
They were made in the same frenzy of building that brought the cloned LR tanks about, and so share some of the same aesthetic; boxy hulls, big, heavy-duty treads, and more stowage and other tanky bits out of the steadily-emptier bits box. In retrospect, the Chimera chassis is so widely used in the Imperial Guard forces I should've built eight or ten of them, but this level of scratchbuilding really takes it out of you. However, I did have the presence of mind to build in one feature the LR clones lacked:
These suckers are modular. The gun assembly slides right out of the tractor section, which grips it tightly without needing to resort to magnets. Now I can make Hydra turrets, Manticore missile racks, even more Chimera hulls if I need them.
I lacked the bits to build a bunch of intricate artillery workings, not to mention crewmen to man the guns, so I just used old paint pots for the breech workings and called it a day. They're hidden by the hull sections anyway, and not so ugly and half-assed looking that they hurt the eye. Honestly I made sure to pack on enough detail on the hull, so even though the guns themselves are rather underwhelming, the model as a whole looks pretty darn good. In fact when they were done, I was genuinely surprised at how well they came out.
In future I'll just look for an inexpensive Chimera hull bit so as to trace them more accurately, but I may just default to the sizing of these to keep things uniform looking. I do like the burlier, more aggressive feel they have over the standard Chim.  I'll definitely keep to the more modular "universal tractor" idea, just to give me room for more interesting builds. Lord knows there are enough Chimera-chassis tanks in the Guard codex. 


In other news, the majority of you have spoken, and the Tyracron will keep his Tau legs. I won't, as someone suggested, change the name to TyraNecroTauCronAnids, as the Tyracrons are supposed to be Void Dragon Necrons, anyway. I've been sketching up some monstrous creature ideas, and it looks like the Carnicron might get a set of EVA-style jaws...

Sunday, February 14, 2010

Cloning Tanks Part 1: The Leman Russ

It's been said elsewhere (and rightly so) that 40k is a "pay for play" hobby. Those models ain't cheap, and by making it possible to field squadrons of tanks and whole broods of monstrous creatures, GW is doing all they can to make sure you want to buy more and more of them. Cheap bastard that I am, I decided to stick it to the Brits with a cloning scheme. 
Here are the two originals. The Leman Russ I was lucky enough to find on-sprue on eBay for around $25. The Griffon came assembled for half that  (and required stripping and repainting), but I only wanted it for the shape and dimensions of the Chimera chassis, so he'd do for that. I decided to make two more of each, and went about tracing the major parts on sheet styrene, which is readily available online or from your local hobby store at comparatively rock-bottom prices. We're 3-4 sheets for $3.50. Add in another $5 or so for the I-beam sticks I used to make treads, and another $5 or so for the L-beams used to join the pieces at a right angle. We're still cheaper than a GW kit. They took about 2 days, total, to cut, assemble, and paint, but the results were these:
Since these were cobbled together well before this blog, I have no how-to pictures, sorry. I need more Chimeras for my IG, not to mention Rhino/Preds for my Marines, so in the future I'll document the process there. To sum it up, it was a lot tracing outlines, cutting, gluing, and waiting. Given the chimney bits I was going to use to make cannon barrels, I cut the turrets big. Lots of parts from leftover GW sprues (Immolator, Russ, Valkryies, Manufactorum and 1/35 tanks) but those monsters are 90% plastic card and yankee ingenuity:
Using those I-beams as treads adds a bit of height to the model, not to mention solidity to the tread sections, which are, as with the Russ kit, assembled individually before the body is built up between them. They're came out a bit wider than the LR, too, but that was due to my own measuring error. By the time I had the central hull sections cut and attached, it was too late. Oh well.
Those with sharp eyes will not that those are Sentinel multi-lasers, which will do in a pinch as lascannons since they're nearly identical. Embellish with a leftover smoke discharger here and an Aquila here and there and you have a burly tank, ready to blast away at those orks. The turrets are fixed in place ( I discovered the joy of magnets later in the year), as are the sponsons, which were a pain in the ass to cut and assemble. I think I prefer the Russian KV-style box turrets to modern slope-sided ones, for the classical industrial look. Also, they made it easy to paint my half-cog Mechanicus insignia on the side. Inside the cog on the left side is the Company number (forming symmetry with the half-skull), while the number in red on the side of the tank is the tank number/squadron number.

The slab-sided turret design is awfully susceptible to anti-armor rounds in real life. You want the slope to deflect incoming projectiles, and a low profile to be hard to target, so in that sense the standard LR turret is more preferred, even if its hull design still isn't. These tanks are an anti-armor unit's dream come true.... 
What really makes it for a tank, I've found, is hanging stowage bits off the turret and armor plates. It gives you that nice extra level of detail and breaks up the silhouette of the model, making it interesting to turn around in your hands. These also represent my first attempts at fake-rivetting by way of a leather punch against the plastic plates; I ended up punching more holes than raised rivets, due to thickness and rigidity of the card. Later on, when plating armor on a dreadnaught, I did it the hard way and actually glued on tiny punched-out rivets. Talk about labor-intensive. All of those hull markings took a bit of time, too, but again, look great. 
This is what happens when you have no archetype to work from for dimensions. This Monolith, my first-ever scratchbuilt tank, absolutely DWARFS the standard model. Personally, I think the massive size fits more with the fluff text, but it's the devil to pack and transport. The lesson here, folks, is to use a template instead of just pulling something out of thin air, like I did. Still primarily plastic card, and thus still cheaper than the kit, though. 

Next time, I'll show you what I did with the Griffon. (although from the previous all-army photo, you can pretty much guess)

Thursday, February 11, 2010

Air Support!


The Valkryie/Vendetta is one of those rare birds that's both a beautiful kit and an extreme joy to use on the battlefield. Of all the Forge World designs to mass-produce, GW certainly hit it out of the park on this one, although at $50+ it's sort of cost-prohibitive. (thank God for eBay)
I won't bore you with pictures of the stock kit, since you've already seen a million of those by now. What I will flash up here is the Vendetta conversion: (as always, click to enlarge)
There are magnetized hardpoints on the wings and wingtips, as well as on the body for the landing gear. I mounted searchlights on the wingtips over the old landing gear wells, which are, of course, still magnetized.

I don't like the idea of an aircraft putting all its weight on wingtip gear, and the four landing gear that FW designed the Valkyrie with just don't make sense to me. (especially that thing under the nose) If this thing lands in mud, that nose-pad is going to get stuck, fast, so we did away with that. I kept the tiny zep gear intact in the back, lengthening it a bit, and moved the wing gear under the body, so it's a bit more solid, now. The Lascannon mounts are made from good ole' heavy weapons team lascannons, mounted together with bits of sprue:

With a lascannon mounted in the fuselage on either side of the nose, we're ready to shoot down those nasty Wave Serpents with their force fields and lance weapons. Of course, if we need another Valkyrie, it turns into one:
But the magnets skew things, dammit. Really I only use those wingtip mounts when he gets mounted on his flying base (realistically, they'd retract up into the body, of course). I also detailed the inside, but left out the gunners. My Guard are a Skitarii regiment, so we auto-target those heavy bolters from inside. I keep forgetting to put mechanized servitor torsos in before I glue the roof on, though, but who's going to look inside anyway?
If I was going to enter one of these in some kind of competition, I'd go back and use some surgical tools to add some kind of servitor to the pintle mounting inside. Looking at Cool Mini or Not and sites like that, I doubt these would even place. Of course, if I were making a model specifically for a competition, I'd have gone that extra mile from the word "go", complete with dry-transfer aircraft decals instead of my hand-painted scrawl. Of course, I would have also weathered it with stippling instead of directional brushing, as well as the chipped-metal effect to the leading edges. A real Mechanicus craft would had an armored cockpit with cameras instead glass, too, I suppose. 
I was originally going to magnetize the base as well, but I wanted the grip to be extra-solid, so I decided to go with pins instead. These are thick paper clips cut with tin-snips, and it grips the model quite well. I don't know how they intended to mount it otherwise, because that translucent stalk-part doesn't clip well into the plastic mount for the helo. Both of my bases are like this, and I've never had a problem with the model slipping off or tipping over. For some reason, I've yet to detail the bases with materials. Maybe it's because the helos travel too fast, so the ground beneath them is constantly changing anyway? 
You will probably never see a Super Valkyrie like this carrying missile pods and anti-armor lascannons, unless someone makes an Apocalypse sheet for one. Both of Forge World's helos are woefully underarmed. Modern helicopters like the AH-64 Apache and heavier Mi-24 Hind carry two pylons per wing in addition to a nose/turret cannon (the Apache gun tracks with the gunner's helmet, too. Way cool!). That's sixteen anti-armor Hellfires or four multi-rocket pods, in addition to the wingtip struts, which can mount one anti-aircraft Sidewinder. I guess I'm spoiled by mechanical designers like Masamune Shirow, who think their tanks and things out a little more. 40k is supposed to be a dark future of slow technological decline, but come on. 
Here's a teaser-image for future posts. Damn you, Dave Taylor. Your army in that White Dwarf article made me fall in love with the Mechanicus, and gave birth to this Guard army. I really should mount those heavy weapons teams on proper bases, but no one I've play has cared. From that distance 50+ infantry doesn't look like a lot, but then this edition of 40k is better for vehicles than foot hordes anyway. 

Monday, February 1, 2010

Painting O' Green


The snow this weekend allowed me to focus on some commission work; a quartet of Eldar Falcon tanks and a Viper jetbike. Three out of four of them came to me assembled (cockpits and all, damn it) which meant some dicey painting on my part, and all required magnetized turrets. While I was painting them, I couldn't help but think of a certain other twin-fanged monstrosity:


(Heavy Raider is (C) Syfy, used without permission)
You Eldar players had to be thinking it. You know you were.

Here's a view of the Eldar their adversaries are used to seeing: their fast retreating backsides. The ramps on these came to me fused, though the one that was off the sprue is still in openable condition. Honestly, all those tines and things on the turrets are just asking for gravity and mischance to snap them off, so I was extra careful. This thing was a pain in the ass to assemble:

The damn turret chair on this thing had to be assembled around the gunner, which meant painting everything in components and finally, painstakingly, fitting everything around each other and letting gravity and tension do the rest. Fortunately, the glue I use, Super Jet, comes in a little bottle with a tiny neck, so I was able to glue the contact surfaces without fusing the thing together. Models like this make me thing GW has it in for hobbyists.

Next post: more Imperium, I swear.