Showing posts with label X-Wing. Show all posts

Saturday, May 4, 2019

A Nebulon B, just in time for Star Wars Day!


As you can no doubt tell, my usual photo setup is NOWHERE NEAR ideal for me to shoot large models. While not the tallest large model I've ever done, it's still definitely the longest. Regardless, I soldiered on with a rudimentary lighting setup and black sheet to bring you a Nebulon-B Frigate. 


It's even longer than its sister ship, the Phoenix Home, but the Pelta-class is broader and masses more. Strangely enough, they both saw the same use in different eras; Peltas were medical transports during the Clone Wars, and of course, a Nebulon-B served as the Rebellion's hospital ship throughout the original three films (well, two of them).


Another Neb owner had the idea of putting the thing on two separate bases so it wouldn't just sweep massive amounts of models off the table, as well as to encourage people to fly through the spar area cinematically. A great idea that I adopted for this model. That front base? That is the same size as the large ship base you see on the Charger C70 in the previous pic. I double-layered the bases not only to add stability to the brass rods, but to keep the tall slender thing from tipping over and destroying its 3D printed self. 


It is, of course, not at all screen accurate. The more you look between this and an actual production still, the more you'll see is wrong. There are places that are not long or short enough, there are details missing. There are windows where there shouldn't be. Quite frankly, I don't care. It's accurate enough for me. The price was right. The time was right, and the occasion (I got a new job! Whee!) was right. 


The internal solidity of 3D printed models continues to vex and confound me. While drilling into the drive section, I discovered it was hollow past the initial outer shell and as a result, the rear rod  had to be SUPER long compared to the bow section one.

Painting felt fast but took a while. This thing has more nooks and crannies than... well, than anything I've worked on to date. I may yet still paint those engines with glow-in-the-dark paint, as they're not as deep as the Pelta's and thus the paint could infuse with light. I'm also still of two minds about printing a small screen cap of Luke & co. for that port-side window. I could've embedded a magnet to mount a Falcon under the spar, but didn't want to compromise the structural integrity of the spar. 

Happy Star Wars Day, folks!


Saturday, April 27, 2019

X-Wing: Some Epic game aids...

As you may know, I have a slew of epic ships. Well, to make a long story short I've finally gotten around to making sheets for them. As always, questions and comments welcome. Enjoy!


Photos of the new Nebulon-B as soon as I can figure a photo setup for the damn thing. It's huge!

Wednesday, July 12, 2017

X-Wing: The Growing Rebel Fleet.....


You may recall my initial foray into 3D printed ships with the Pelta-class frigate, Phoenix Home II. (better pictures of her to follow) The same ebay seller has printed a number of other, smaller vessels, and I was happy to see an inexpensive Consular-class cruiser. Nabbing it and another vessel up immediately I was off to Shapeways to find the appropriate turrets, turning it into the more militarily useful Charger C70 refit you see here. I didn't have the heart to clip the rest of the sensor dishes to make it a true Charger, however, but I suspect by the time of the Rebellian era any remaining craft would've been modded, anyway. t love this little ship, and I still might buy another to turn it into the poor doomed Radiant VII (one wonders what happened to the other six...)


A triumph of Star Wars' art room, she manages to look swift despite her industrial clunkiness. Detailed studies of it remain absent from the art book, more's the disappointment. Hunting around on the web turned up model sheets from the excellent Clone Wars series, so I was able to see how her stripes lie and where, not  to mention confirm the location of her turrets (just aft of the small escape pods). 


She's light as a feather compared to the Phoenix Home II, with its side-facing fighter bays. That Litko base is just fine for her, as are the two acrylic rods, but barely. Why FFG didn't make Consular/Chargers I'll never know. Oh shit, I should've shot her together with the Blockade Runner, too. Oh well. I have yet to find a pic of the two together in actual scale, but I imagine the bridge section of the Pelta compares to that of the CR70. Interesting reuse of the geometry, there, CW designers. It also fits the reuse-necessity of wartime production. 


If she looks a bit different, it's because I shot her against the reflective shelf paper instead of the cloth photo background/lightbox. She's just too big to have fit in there. I tried to adjust back the contrast and saturation to true, to compensate, which blew out the background a bit in these shots. 


Prior to painting her I toyed with the idea of wrenching her apart at the seams to light her engines, but things were just assembled too flush. I also did some experiments with glow in the dark paint for the running lights and windows, but didn't really like the result. Her engine pods were built loose enough to take being primed without fusing, which was pleasantly surprising. I'd messaged the seller about getting an unassembled one, but he/she/they'd never responded. Oh well.


6mm AA turrets from Vanguard Games' range. They come in packs of 4 with some other turrets I have yet to find a use for and are delightful. 


I tried to pick out the major details like escape pods, and did the windows in bright white so they'd catch the light despite being recessed. Oh, for a plastic version conducive to LEDs...


I also made sure to dual-color her hull plating, just like the original. I'd like to think they put two wrecks together into one good vessel and sent her out. Yes, the photo looks a bit weird, but if you'll notice from the bridge tower I'm not exactly 90 degrees above her, so...


If you want to keep your Pelta as an unarmed Medical Frigate there are some nice details in the wells on either side of her prow. The Rebels version has anti-ship cannons there, so I mounted some Tau burst cannon halves on bits of sprue. There's something about the grain of the print I find fascinating. Sanding the whole model down would've been a nightmare, so I left it. 


I had hoped against hope that the Acclamator would be longer than it was. Sadly, it's large enough to pass for a bulk transport or corvette (in fact, she's exactly as long as the Raider) but that's about it.  I suppose with some work you could turn her into a passable Vigil-class, with its fat bridge wing. I thought about painting her in Republic colors, but with the above two ships my Imperial fleet would be sorely outnumbered, and I'm fine with a grey standard look for her anyway. 


One thing I discovered whilst boring into her belly to mount that GW flying stand; these models are squishy inside once you get past the tough outside shell. Probably should have sanded her hull a bit, but I wanted to save her raised detail. Some panels are raised more than others, and I didn't want to obliterate the shallow relief. 

Wednesday, December 7, 2016

(X-Wing) Flagship WIP #2


Getting there, getting there. Now with an A-Wing for scale. 

She has a real hard-weathered, acid-washed look to her, like someone's been parking her somewhere nasty. I suppose, dating from the Clone Wars, she wasn't going to be new and shiny. 

Saturday, December 3, 2016

X-Wing Flagship WIP's


Yes, my desk is a shambles. Yes, the lighting is terrible. Yes, those are Tau burst cannons acting as anti-ship turrets. 


Yes, those AA guns are from Vanguard miniatures. Yes, they are on the top and bottom of the hinges. 


Yes, she is rather long. Yes, I forgot to put an A-Wing fighter in there for scale. Yes, that is Vash the Stampede in the background.


Yes, she is a bit blotchy; you would be too if you survived a Clone War. Yes, those nubs are life pods.

Tuesday, October 18, 2016

(X-Wing) The Birthday Flagship...


It's my birthday today, so I took the day off, and look what arrived in the afternoon mail: a  Pelta! I ordered it nearly a month ago. Great timing!


She's even larger than the largest rebel epic ship and a nearly solid hunk of 3D printed material. Detail isn't as high as an FFG model, sadly, but there's enough on there to look good.  Also, she's a Clone Wars era ship, not the Home One mod with the A-Wing bay from Rebels. What I might do is bore into her docking bays and put in base bits so I can dock A-wings and other star fighters.  


The engine sections also hinge open, but the chunk holding them on is verrrrrrry solidly glued on, and I'd be hesitant about digging it off. I had messaged them before about whether they had an unassembled one, but alas, no answer. I'll need to put some basing parts in as well, so I'll be checking Corsec and Litko. 

I wonder if I can finish the rest of the 11 Deathwatch and their Corvus Darkstar before the basing stuff comes?

Monday, July 25, 2016

Adventures in Lighting...

I'm home with the flu today, so here's a post I've been meaning to do. 

The larger ships of X-Wing have continued to hold my attention, and being somewhat of a completionist, I've embarked on a quest to add LED lighting, aided by fiber optics, to the ships in my collection. This is not without its challenges, such as taking apart things that are obviously not meant to be pried apart, running optical fibers everywhere, and jamming little circuit boards and batteries into things. I haven't graduated to soldering things yet, but with the limitations of space making Powered Play games products only usable in larger models, this is on the horizon.

You may recall my first effort, the Millennium Falcon's engines and headlights:


She required quite a bit of sawing, as well as some additional installation to get rid of all the light bleeding around the cracks. In retrospect, I should've done the bottom panel instead of the top one, but overall, the effect is rather pleasing: 


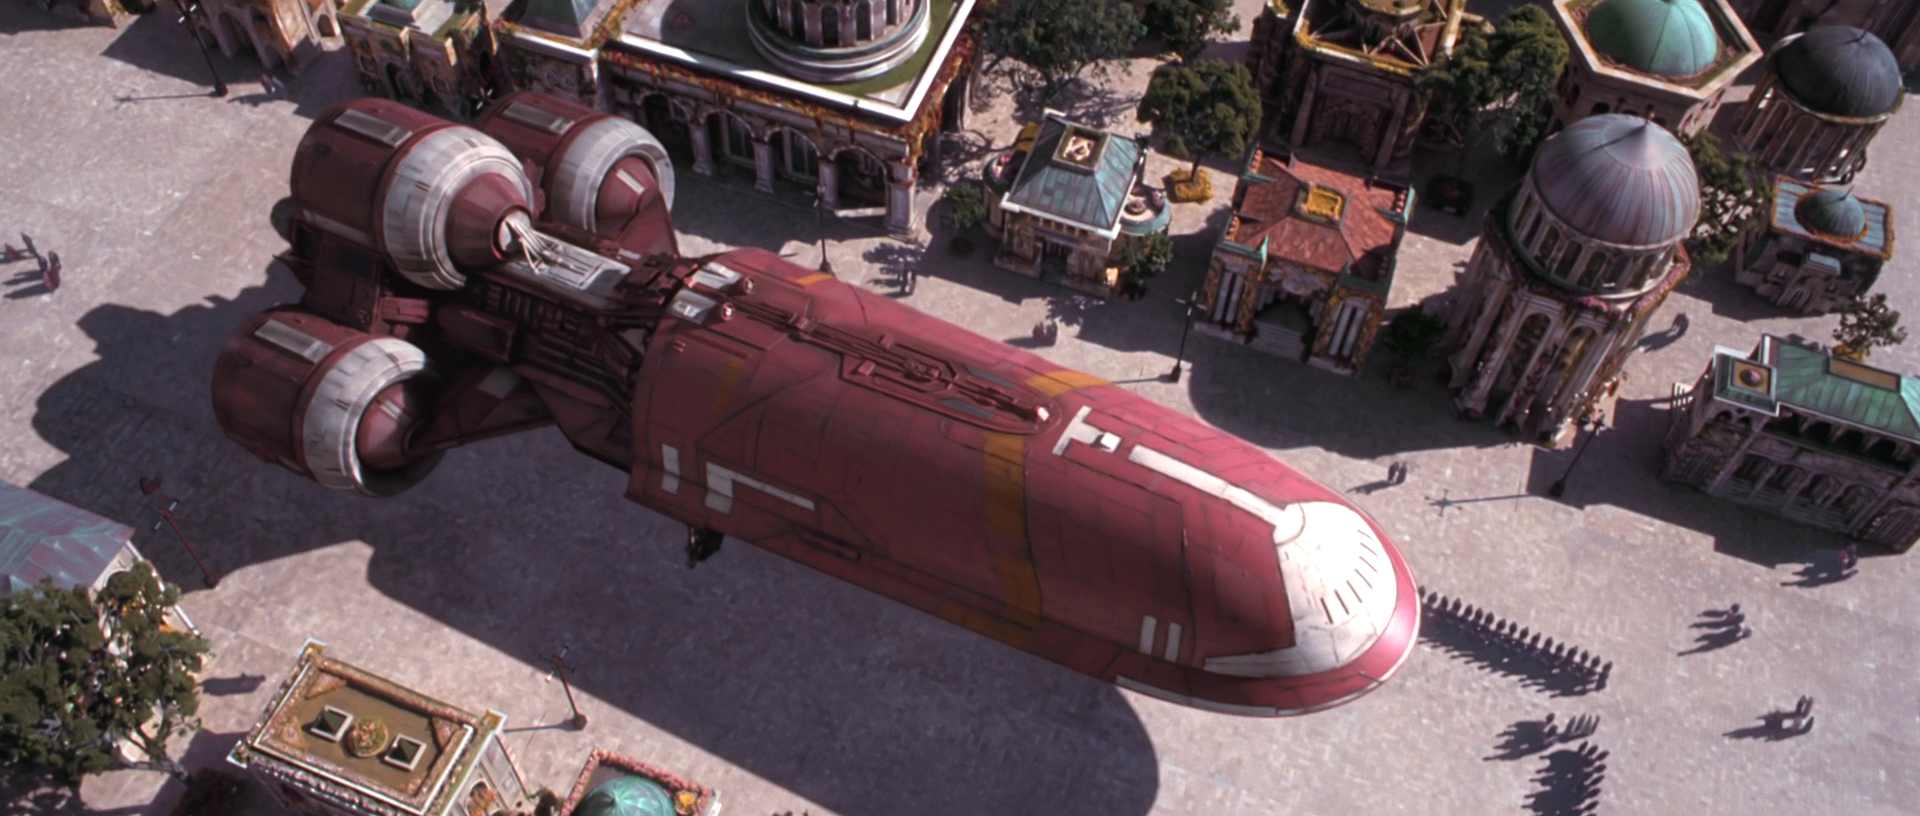
My next effort was both more and less easy; an Imperial Raider Corvette, which I have since christened the Rectifier. 


Pulling her apart was an exercise in horror, as I realized too late that her TIE panels were, in fact, clamps holding the top and bottom shells together. Both shot off in different directions before I could realize their nature and function. Luckily, repairs were easy and sturdy.

Yes, in retrospect I should've added more lights...
Speaking of said lights.


Her switch lives here, which I can live with, since you never see it anyway.
Her insides are an organized chaos of fiber optics running every which way and taped up LED wiring. I misjudged the fiber's propensity to break once secure by CYA glue, which resulted in a lot of re-cabling and re-drilling, and as a result there are half the number that there should be. There are still a few bits where I couldn't quite get to the old fibers, and the new ones are held in there by nothing but friction. Those illuminate dimly, thanks to light spill from all the working ones. I may yet go back and re-drill them, running their fibers to red LEDs to provide a little light variety. 


Following on the heels of this project, I attempted another, simpler one: the VT-49 Decimator. Pulling her apart was made easier by an online source, and turns out to be less tricky than you'd think. 


Her engines were filled by way of a hot glue gun, which gives them a weird sort of uneven mottling that I quite like. With the scarcity of translucent sheet plastic (you'd think there'd be more out there besides milk containers....) the hot glue filled the bill, and I had to be careful not to melt the actual model with the hot nub. 


I had originally planned to two-tone the fiber optics running to the doors and front running lights, so the doors could have both red and white lighting, but it was not to be. I was informed by someone who knew better informed that the chemistry of the battery won't support both red and white strands, which is an oddly arcane factoid worth remembering for future projects. 

Yes, I know there's light peeking out. No, there's no way to stop it short of sealing the hull and locking in the battery
My latest project is the Gozanti-class Imperial Assault Carrier, who will carry forward the lessons learned from the preceding projects. Be warned, modelers, that this thing is deceptively difficult to wrench to intact pieces, and I very nearly broke her keel. Gentle and Firm are two things difficult to balance when dealing with its crazy architecture. 

There is not enough room in this hull for these wires. Do not do as I did;  instead run the fibers all the way to upper hull.  
One of the issues I ran into was due to some poor planning on my part; I thought I'd have more white lights running from the board than was actually possible, and ended up having to re-do all of the fiber optics to both halves of the wing hull needed only 1 light each instead of two. This proved to be a boon, as it lessened the amount of crap that had to be crammed into a relatively flat area. You can see how insane it looks. Some of the fibers bent too far and lost their conductive ability. Most of them are fine, however.


Another issue is all of the crap crammed into the upper hull. Managing the wiring isn't easy in such a small space, and made less so by the different areas it has to funnel to. Added to that are the concerns that nothing can be made permanent because you have to be able to change bad LED bulbs and the battery. 

Yeah. 

Another issue: light bloom from the cracks. ARGH!
Looks pretty though, right? 

Tiny switch would be great for Slave-1 and the Imperial shuttle, too. 
One of the protrusions on the side of the hull was the perfect size to accommodate the switch, too. I'm glad that Powered Play switched to these instead of its old huge clunky switches which, while great, were impossible to embed in a notch like this. 

If anyone's successfully done either Outrider or CR-90, let me know. The GR-75 Rebel Transport came apart easily enough, but the damn Outrider continues to confound me. Slave-1 and the Lambda-class Shuttle came apart easily enough, but I have yet to find a plug/play solution that will fit their tiny frames beyond a battery stuck directly to a light, which may result in my first foray into soldering. (gulp)

Monday, March 3, 2014

Time for a little X-Wing....


This Falcon, after much cutting and scrapingwas lit using Poweredplay Gaming's lighting products, which, true to their word, are easy to mess around with and install. If I have a complaint, it's that they don't (yet) have a coin-battery cell that fits into FFG's Slave-1


Cringe-inducing, isn't it? There's enough room in there for the board and switch, but the big honking 9v cell just won't fit. Not to worry, though; I found some on Amazon, complete with wiring, which will hopefully fill the bill. The FFG ships are made of a resilient plastic with the right amount of form-holding bendability, so once I took the battery out and clamped the bottom plate back in place, she looked like she'd just come out of the box. The Falcon's rear plate clamps back on its little peg quite snugly as well, without the need for magnets. I honestly wish FFG would come out with a hobby series of unpainted ships on sprues, but oh well. They pull apart easily enough if you're determined (and bold), but do be careful. 

My foray into X-Wing also marked my first Shapeways order, which resulted in this: 


Better pics to follow, I promise. FFG neglected to package a senatorial shuttle with its starter set, probably because it would've been huge. Nonetheless, you too can buy one from Shapeways, no doubt incurring the wrath of Disney/Lucas/FFG if you do. I honestly have no idea how those brave sculptor/sellers haven't been hit with a cease-and-desist yet, but wow, talk about having great big pirate balls.