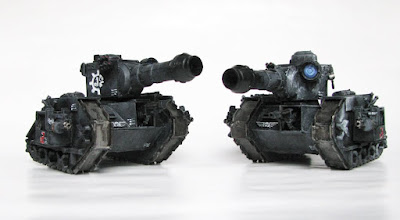
Here are the two originals. The Leman Russ I was lucky enough to find on-sprue on eBay for around $25. The Griffon came assembled for half that (and required stripping and repainting), but I only wanted it for the shape and dimensions of the Chimera chassis, so he'd do for that. I decided to make two more of each, and went about tracing the major parts on sheet styrene, which is readily available online or from your local hobby store at comparatively rock-bottom prices. We're 3-4 sheets for $3.50. Add in another $5 or so for the I-beam sticks I used to make treads, and another $5 or so for the L-beams used to join the pieces at a right angle. We're still cheaper than a GW kit. They took about 2 days, total, to cut, assemble, and paint, but the results were these:
Since these were cobbled together well before this blog, I have no how-to pictures, sorry. I need more Chimeras for my IG, not to mention Rhino/Preds for my Marines, so in the future I'll document the process there. To sum it up, it was a lot tracing outlines, cutting, gluing, and waiting. Given the chimney bits I was going to use to make cannon barrels, I cut the turrets big. Lots of parts from leftover GW sprues (Immolator, Russ, Valkryies, Manufactorum and 1/35 tanks) but those monsters are 90% plastic card and yankee ingenuity:
Using those I-beams as treads adds a bit of height to the model, not to mention solidity to the tread sections, which are, as with the Russ kit, assembled individually before the body is built up between them. They're came out a bit wider than the LR, too, but that was due to my own measuring error. By the time I had the central hull sections cut and attached, it was too late. Oh well.
Those with sharp eyes will not that those are Sentinel multi-lasers, which will do in a pinch as lascannons since they're nearly identical. Embellish with a leftover smoke discharger here and an Aquila here and there and you have a burly tank, ready to blast away at those orks. The turrets are fixed in place ( I discovered the joy of magnets later in the year), as are the sponsons, which were a pain in the ass to cut and assemble. I think I prefer the Russian KV-style box turrets to modern slope-sided ones, for the classical industrial look. Also, they made it easy to paint my half-cog Mechanicus insignia on the side. Inside the cog on the left side is the Company number (forming symmetry with the half-skull), while the number in red on the side of the tank is the tank number/squadron number.
The slab-sided turret design is awfully susceptible to anti-armor rounds in real life. You want the slope to deflect incoming projectiles, and a low profile to be hard to target, so in that sense the standard LR turret is more preferred, even if its hull design still isn't. These tanks are an anti-armor unit's dream come true....
What really makes it for a tank, I've found, is hanging stowage bits off the turret and armor plates. It gives you that nice extra level of detail and breaks up the silhouette of the model, making it interesting to turn around in your hands. These also represent my first attempts at fake-rivetting by way of a leather punch against the plastic plates; I ended up punching more holes than raised rivets, due to thickness and rigidity of the card. Later on, when plating armor on a dreadnaught, I did it the hard way and actually glued on tiny punched-out rivets. Talk about labor-intensive. All of those hull markings took a bit of time, too, but again, look great.
This is what happens when you have no archetype to work from for dimensions. This Monolith, my first-ever scratchbuilt tank, absolutely DWARFS the standard model. Personally, I think the massive size fits more with the fluff text, but it's the devil to pack and transport. The lesson here, folks, is to use a template instead of just pulling something out of thin air, like I did. Still primarily plastic card, and thus still cheaper than the kit, though.
Next time, I'll show you what I did with the Griffon. (although from the previous all-army photo, you can pretty much guess)


3 comments:
Those are Nice, I'm part of a yahoo group called BWC-archive that does a lot of scratch built 40k vehicles. You should take a look, there are a number of templates already in the files section that may interest you, and you can submit your own templates to the group if you desire.
Excellent mate, I'm planning on getting into scratch building this year. So, if by the end of the year, I can come up with anything that's close to those, I'll be well happy.
That is some fantastic work you have there. Question though, what kind of tools do you use to cut/shape the polystyrene/plasticard? I am trying with just a plain-jane exacto and Dremmel and am not doing so hot.
Post a Comment