Saturday, June 2, 2012
Tutorial: the Weathered Penny
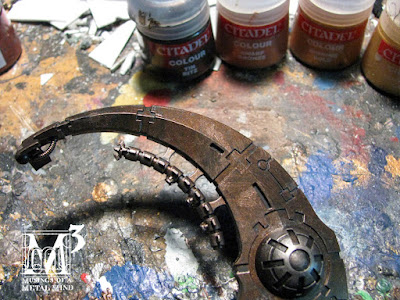
So many people have asked about the weathered penny, that I thought I'd share how I do it, this time with pictures. (No Tachikomas in this one, unfortunately,they're still sleeping off the effects of their victory party). Above are the materials you'll need, including the flat brush (available at any art/hobby store) and mini/tray grey foam. I realize that Citadel may have changed some of their metals since this photo was taken, but from the color spread, you get the idea. In additional you're also going to need, of course, model:
This bit was primed in black, then dry brushed with Tin Bitz. The tin Bitz was applied very hastily and sketchily,with more attention paid to raised areas and places where the primer was allowed to pool and bubble a bit.
At this point we're going to start infusing th foam with color, by way of simply dipping the brush tip in the pot and wiping most of it away onto the foam. From this point on, the foam's going to be your source of pigment for dry brushing and blending. Every so often we'll need to re-infuse it, as the paint drys quickly through use. (This technique, though kinder to brushes, is still dry brushing, so I recommend having backup brush and switching off between the two, cleansing the first one and starting with the dry, fresh second one. After you can give them a bath in Simple Green and water and they'll be like new.)
With only the barest paint left on the brush, you're going to begin running the flat side of the brush along the raised edge of the model, like so. You'll be leaving a thin line of paint on that raised edge, and periodically flicking inwards over the flat areas. Not broad, covering strokes, a light touch in important here to achieve that weathered, worn effect:
You're going to want to hit all the major edges, then com back and hit those minor ones. Not that we never actually do any large applications over the major areas, but keep flicking in just barely from the edges.
After each complete edging, you're going to be blending successively brighter colors into your foam palette. The advantage of the foam come in here; the paint's pooling and mixing here with each wipe, and getting progressively lighter while still maintaining bits of the last color. This multi-toned brightening effect gets passed on, of course, when you start anew with the new color:
As you can see, this technique can be applied over even complex areas. Just make sure you don't go hog-wild; leave broad areas untouched or barely-touched by pigment, and concentrate on the edges, continually building up tone. It's important that you let your off-duty brush dry out completely, because wet-brushing will ruin the rough finish of this technique.
in the end, you end up with a nice weathered surface very much like this one. I nearly drove myself crazy using this on my Ghost Arks (you'll see why next post). Hope this helps, folks!
Happy Saturday.
PS, it looks like the insectoid Scythes won out, so there will be no flying croissants here folks. Just more bugs with better parts from the new range.
Subscribe to:
Post Comments (Atom)


4 comments:
Excellent tutorial! The metals look great. Nice work!
Very nice. I love the look of the weathered copper. The tutorial was well done too. I will have to try the foam palette idea.
Very nice. I love how the look came out. Great tutorial too, I will have to try the foam palette idea.
I highly recommend it. Been using since I was painting Battletech minis back in the '90's.
Post a Comment